Grandma Grieb’s Carrot Pudding

carrot-pudding
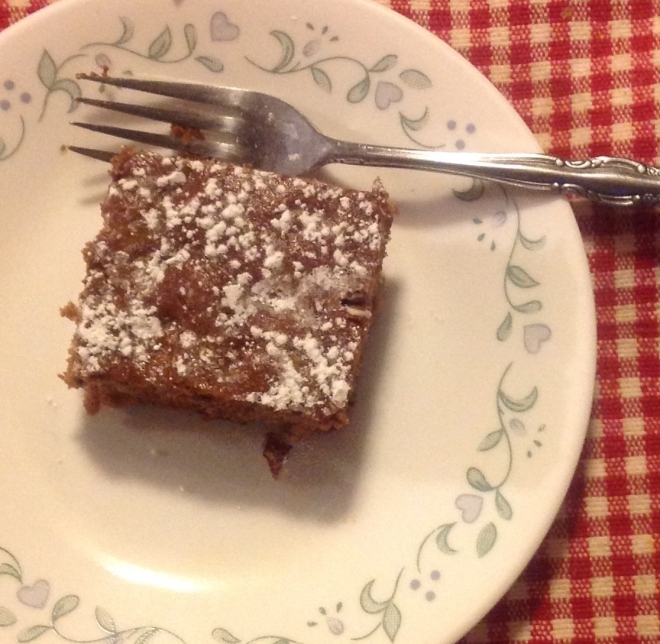
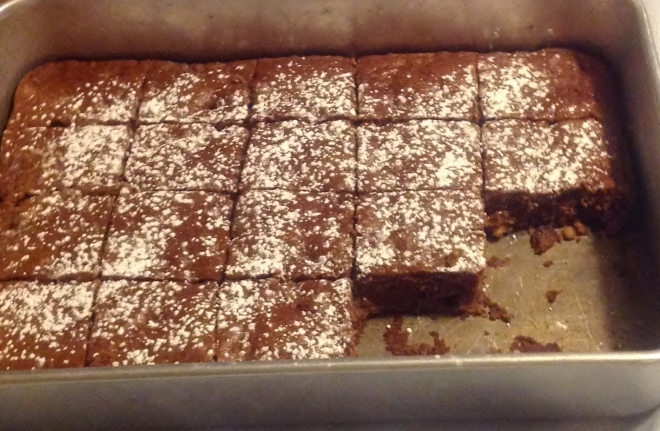
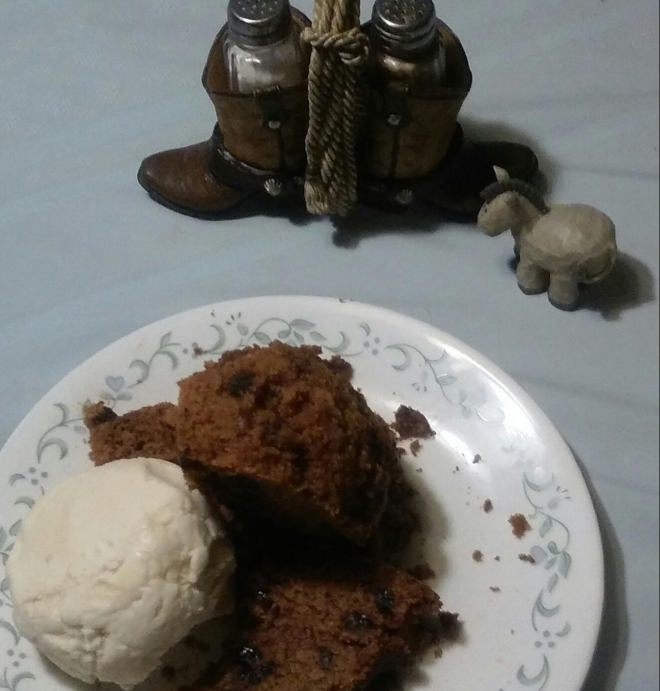
Memories are made with family gathering to celebrate special days. Special foods are usually part of the tradition and memories. For the past 60 years Carrot Pudding has been a must for Carl Grieb at Christmas.

Recipe for: Grandma Grieb’s Carrot Pudding

From the Kitchen of: Gertrude Grieb                  Servings: 12

Ingredients:

1 cup grated carrots
1 cup sugar
1 cup grated apple
1 cup raisins
1 cup suet or ¾ cup butter
2 cups flour
½ tsp. cloves
1 tsp. cinnamon

Instructions:

  1. Mix butter and fruits
  2. Add dry ingredients
  3. Put mixture in butter mold (large).
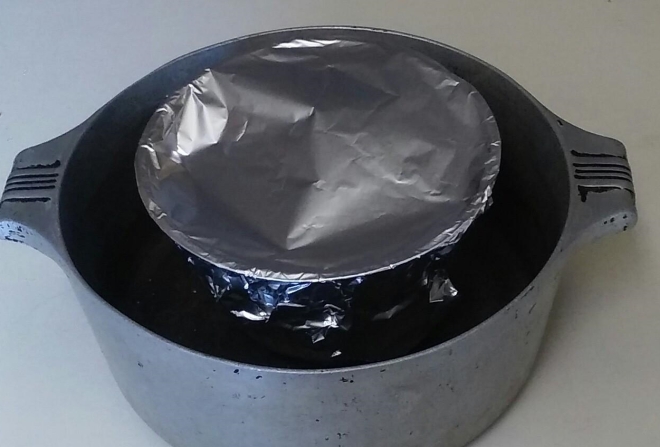
  4. Steam 2 ½ hours (place mold with pudding in stew pot containing 2 inches of water, cover mold with aluminum foil). Steam in simmering water.

cooking-carrot-pudding

Hard Sauce Topping:

1 package powdered sugar
1 cube butter
1 tsp. vanilla
Mix together by squeezing by hand to form a ball

To serve:

Slice pudding and then top with a slice of sauce.

Grandma Grieb’s Icebox Cookies


icebox-cookies
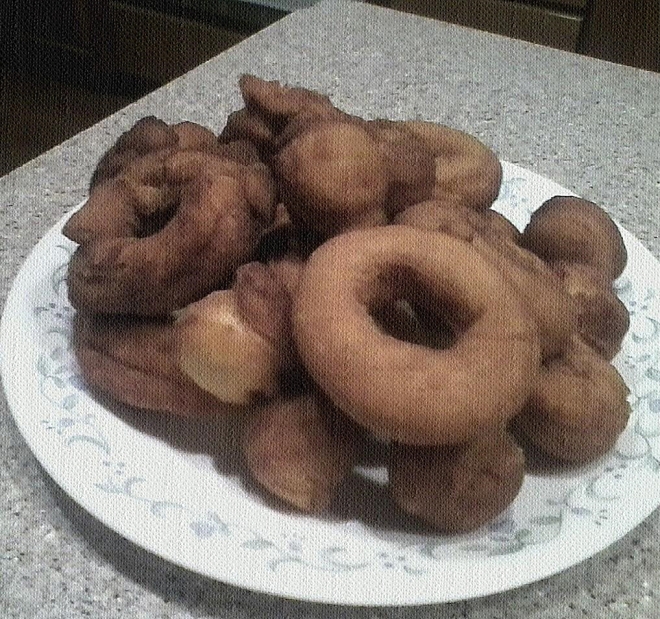
Grandma’s icebox cookies were another family favorite. They were easy to keep on hand so Grandma could bake fresh cookies for her hungry brood. She would make a big batch, form them into rolls and store them in the refrigerator. Then when she needed a fresh cookie treat she would go to the ice box, pull out a roll, cut them into cookies, bake and serve. These were Stanley Grieb’s favorite. The grand kids enjoyed eating the raw dough.

Grandma Grieb’s Icebox Cookies

From the recipe files of Gertrude Haven Grieb

Ingredients:

2 cups of butter

1 cup brown sugar

1 cup castor sugar

2 teaspoons baking soda

1 cup ground walnuts

1 cup raisins (some relatives leave this ingredient out)

6 cups all purpose flour

Directions:

Mix well with hands, add more flour if needed.

Roll into two rolls, 2″ thick.

Wrap rolls tightly and refrigerate overnight.  Slice into thick slices about 1/4″ place on greased cookie sheet and bake at 350°F for 9 to 11 minutes. This recipe makes about 11 dozen cookies.

Storage:

Store rolls in the refrigerator or freezer for future use. Wrap the logs tightly in plastic wrap, then place the logs in freezer bags, squeeze out excess air then place in freezer. When ready to use the dough, let it sit out for a few minutes before slicing the logs. Frozen cookie dough may need a few minutes more to bake.

Grandma Grieb’s Applesauce Cake

piece-of-applesauce-cake

Grandma loved cakes with fruit in them. Her favorite was prune cake, but the family favorite was Applesauce cake. The whole family looked forward to enjoying a slice. Grandma’s Applesauce cake was made even more special by using Grandma’s homemade applesauce. This delight was often available in the afternoon, served with hot green tea.

Grandma’s Applesauce cake needs no frosting, but looks and tastes delicious with a light dusting of powdered sugar on top.

Grandma Grieb’s Applesauce Cake

Recipe by: Gertrude Haven Grieb

Sift together:

  • 2 cups flour
  • 1 cup castor sugar (granulated)
  • 1 tsp sugar
  • 1 tsp soda
  • 1 tsp cinnamon
  • 1 Tablespoon cornstarch (if using juicy homemade applesauce)
  • 3 Tablespoons chocolate ( I use cocoa powder)
  • 1/4 tsp salt

Combine the following and mix well with the dry ingredients:

  • 1/2 cup oil
  • 1 cup applesauce
  • 1 cup raisins
  • 1 cup chopped walnuts

Pour mixture into a 13 x 9 inch greased pan. Bake at 350 degrees for 40 minutes or until done.  Lightly dust top of cake with powdered sugar. Cut into squares to serve.

applesauce-cake


Grandma Gertrude’s Delicious Potato Salad

Potato salad with tomatoes from the garden

Yummy Potato Salad with Garden Fresh Tomatoes

Potato salad was always on the menu for the potluck table at Grieb family get-togethers, and at every family barbeque. The big yellow pyrex bowl filled to the top with goodness was loved by all. Aunt Ida always made a second bowl of the salad so no one went without; even with a second bowl leftovers were seldom.

Potato Salad

Gertrude Haven Grieb

  •     7 large russet potatoes
  •     4 eggs, boiled and peeled
  •     1 Tablespoon onion powder
  •     1/2 teaspoon garlic powder
  •     1 3/4 cups mayonnaise
  •     4 Tablespoons yellow mustard
  •     5 Tablespoons bread and butter pickle juice
  •     Salt and Pepper to taste

Directions

Boil potatoes in skin until fork tender, drain and peel.  While warm cut into cubes. Peel and chop boiled eggs. Meanwhile, as potatoes and eggs are boiling, mix together onion, garlic powder, mayonnaise, mustard, pickle juice, salt and pepper to taste. Mix dressing with chopped eggs and warm potato cubes until combined. Chill for at least an hour before serving.


Planting Olallieberries

More Olallie picking (716x448)

Ethan and “Little P” Planted Olallieberries at Grieb Ranch

Olallieberries are classified as a type of blackberry, and a cross between a “Youngberry” and a “Loganberry”. Olallieberries are shiny and full of juices that most would consider tart. Jams, pies and even wine can all be made from Olallieberries. If you live in U.S. Department of Agriculture plant hardiness zones 7 through 9, you can plant a patch of Olallieberry bushes in your backyard. Keep in mind, however, that it takes two years from the date of planting before edible berries make their appearance.

How to Plant an Olallieberry Bush

  1. Block off a 5- by 18-foot space in a sunny location for growing your olallieberry bush. Olallieberries will tolerate a little bit of shade, but they prefer full sun.
  2. Test the soil in the area you want to plant the Olallieberries. Ideal soil should have a pH between 5.5 and 7. You can get a soil test kit at your local county extension office or from a gardening center. According to Oregon State University, you can add lime to the soil if the soil is too acidic.
  3. Erect a trellis at the back of your blocked off space. As the Olallieberries grow, they will need the support of the trellis.
  4. Work manure in the soil before planting at a rate of 2 cubic yards for every 100 square feet of space. If you don’t have manure, you can use compost.
  5. Dig out a hole to place your Olallieberry root ball in. The hole should be slightly bigger than the root ball. Wet the ground in the hole so that it is moist and then plant the root ball. Use some of the soil you removed to fill the space surrounding the root ball.
  6. Water the Olalliberry bush with 1 inch of water one time each week.
  7. Check frequently for weeds and remove them immediately.

Olallieberry picking (740x479)

Barbara the rooster lady gave Connie plants in 2016.  She got her plants from her Father who got the original stock in 1956 when he bought his first house.  Every time the family moved he/they took plants including the Olallieberry bushes.  Now after many moves Barbara has passed the Olallieberries on to Connie and they were planted at Grieb Ranch.


Yummy Berry Sauce as a Topping for Cake or Ice Cream.

Ingredients:

1 cup berries (Strawberry or Olallieberry)

1 cup water

1 cup sugar(or less to taste)

*  *  *

2 Tbls Cornstarch

2 Tbls water

Directions:

Combine fruit, water and sugar ingredients in sauce pan and bring to a boil.  Mix cornstarch with the 2 Tbls water in a small bowl. Add cornstarch mixture to boiling fruit mixture and stir until thickened. Remove from heat and cool slightly. Add 2-3 cups fresh berries to sauce and mix gently.

Pour over your favorite ice cream or cake. Yummmmy!


Grandma Grieb’s Doughnuts

Donuts lightly noised

Forty-five years ago when Margie (Grieb) and Scott Runels were first married Scott fell in love with Grandma Grieb’s doughnuts.  When Margie asked Grandma for her recipe she said she didn’t have one, but offered to teach Margie how to make them. Margie jumped at the chance to go over to Grandma’s and watch her. The following doughnut recipe is the result of their time together.

Grandma Grieb’s Doughnuts

Beat Together:
1 1/2 cups sugar
2 eggs
1 1/2 cups milk
3 tbsp. oil
2 tsp. vanilla

Sift and add:
5 cups flour
1/2 tsp. salt
5 rounded tsp. baking powder

Gradually add and knead in another 1/2 cup flour on floured board.

Roll out, cut and fry in oil on med. heat.  (I just use my fry daddy)

Venison with Bacon Recipe

venison with bacon

In years past during deer season – which is in the Fall here on the Central Coast – we would often sit around the picnic tables on the patio and slice meat for jerky and cut and wrap the rest to put in the freezer. Now we get out the meat slicer to prepare the jerky meat. For many years the Grieb Ranch had a walk in cooler to chill and age the venison.

Recipe for: Venison Recipe

From the Kitchen of: Connie Grieb Willems                    Servings:5

Ingredients:

3 strips of bacon

1 Venison Backstrap Sliced

Instructions:

  1. Cook Bacon until half done
  2. Place slice backstrap slices on top of the bacon.
  3. Cook on medium high heat until the meat is medium rare (overcooked venison is like trying to eat shoe leather). When the juices in the backstrap slices rise to the top on one side flip to the other side.
  4. The taste of the venison varies with the age of the deer and the vegetation that it has been eating.

When cooking a venison roast I cook it at 325 degrees. The roasting takes about 20 minutes per lb.

Additional notes: One of the most popular methods of preparing this cut is slicing the meat in filet mignon-sized portions — 1-2 inches (2.5-5.1 cm) thick — marinating them, wrapping them in thick-cut bacon and grilling them. Wrapping the meat with bacon not only adds extra flavor, it also changes the way the meat is cooked because of the fat content. The meat is ready to be taken off the grill after the outside edges are slightly crispy. The internal temperature of venison should reach at least 160 degrees Fahrenheit (71 degrees Celsius) for safety.

Ag Adventure Fruit Pizza

Ag Adventure Fruit Pizza

Ag Adventure Fruit Pizza

We just finished up the Girl’s week of Ag Adventure Camp and one of the foods they made was Fruit Pizza. Not only was this a hit for the girls, it also got rave reviews from the volunteer staff. The Fruit Pizza boasts a sweet, crumbly crust, a slightly-sweet, creamy filling and is topped with the freshest fruits of the season. Since we live on the Central Coast Strawberries are a must!

The recipe is super easy – so easy we made it in a barn!


Ag Adventure Fruit Pizza
From the Kitchen of: Connie Grieb Willems                    Servings: 16

Ingredients:

Crust:
1 18 oz package refrigerated sugar cookie dough, softened

Filling:
1 8 oz package cream cheese, softened
4 tablespoon powdered sugar
½ teaspoon vanilla

Topping:
1/2 cup peach preserves
1 cup fresh strawberries, stemmed and sliced
2 kiwifruit, peeled and sliced
2 peaches, pitted, peeled and sliced
Whip Cream

Directions:

Crust: Preheat oven to 350 degrees F.  Shape cookie dough into ball and place dough in center of round stone or pizza pan. Using lightly-floured rolling pin, roll out dough to 12-inch circle or fill a rectangle pan, about ¼ inch thick. Bake 18-20 minutes or until light golden brown. Cool Completely

Filling: Combine cream cheese, powdered sugar and vanilla in small bowl; mix well. Spread mixture evenly onto top of cookie crust then top with preserve.

Topping: Remove stems and slice strawberries (an egg slicer works well).  Peel and slice peaches and kiwi fruit, or your favorite fruits and arrange over preserves to cover entire crust. Pipe whipped cream topping around edge of fruit pizza. Cut into slices with a pizza cutter.

Fresh Summer Fruits From the Orchard

Enjoying the fruit of our labor.

Enjoying the fruit of our labor.

“The fruit of our labor” is quite literal here at Grieb Ranch as we enjoy summer fruits plucked fresh from the Grieb orchard trees. With Summer just around the corner we are anticipating another season of deliciousness. The Anna apples are just coming ripe, the first of the apple crop.

Orchard Apricot Jam

Orchard Apricot Jam

The Aprium and Katy apricots have come and gone. The birds came in just as the apricots were barely ripe and knocked hundreds of apricots all over the ground. After all the working of watering, hoeing, tilling, etc. the birds were getting the best. What they knocked off we picked up and used for apricot syrup, apricot jam or fruit leather.


Grieb Ranch Apricot Syrup Recipe:

  1. Wash apricots (about 3 lbs), cut into quarters and throw away the pits. There is no need to peel the apricots, although you can if you wish.
  2. In a large Dutch oven, cook the apricots in a little water until they are soft, then puree using a blender or food processor.
  3. Measure the puree (I had 6 cups of puree) and then put it back in the Dutch oven. Add an equal amount of sugar and about 1/4 cup of lemon juice. The lemon juice keeps the apricots nice and bright but you can leave it out. The cooked syrup will be a darker brown color, but will still taste great!
  4. Stir the sugar/apricot mixture until the sugar melts, but first……TIP (this will save you much frustration and mess) take a stick of butter and just rub it along the inside lip of the Dutch oven. The butter fat will keep the syrup from boiling over. This is the voice of experience, apricot syrup all over the stove, floor, etc. is a sticky mess.
  5. Bring the mixture to a boil, and stir often until it reaches 215 – 218 degrees (use a candy thermometer).
  6. Remove the mixture from heat, stir and skim off the foam if there is any. Pour into 1/2 or 1 pint jars (I used 3/4 pint jars here, but they aren’t always easy to find). Leave about 1/2 inch of headroom.
  7. Wipe the jar rims with a moistened paper towel and put on the two-piece lids.
  8. Bring water to a boil in a water bath canner, add the syrup jars (using the little basket that keeps the jars off the bottom of the canner), make sure that they are covered with 1-2 inches of water and bring back to a boil. Reduce heat somewhat (you still want it to be boiling though) and process for 10 minutes.
  9. Remove the jars and set on a towel on the counter top to cool. There, you have made delicious syrup perfect for pancakes or biscuits all winter long.

Some additional tips: The 6 cups of puree made about 4 pints of syrup.  You can also use this same basic recipe to make raspberry, strawberry, blueberry, cherry or grape syrup. Don’t reduce the amount of sugar as the recipe won’t work. For lower sugar syrup look for an approved reduced sugar jam recipe (ask your local extension agent) and cook until it is just short of  setting. Syrup is basically runny jam!

Happy Easter From Grieb Ranch

Sunrise1

“The angel said to the women, ‘Do not be afraid, for I know that you are looking for Jesus who has been crucified. He is not here, for He has risen, just as He said. Come see the place where He was lying. Go quickly and tell His disciples that He has risen from the dead; and behold, He is going ahead of you into Galilee, there you will see Him; behold, I have told you.’ ” Matthew 28:5-7

After a Sunrise Service to celebrate “He is risen!” on Easter morning, we serve our guests fresh-squeezed Orange Juice from our own trees and a Western Omelette.


This Western Omelette recipe is a big hit for a branding breakfast or as early nourishment for the hands on shipping day. It is also a favorite breakfast dish enjoyed by the guests at Grieb Farmhouse Inn (Bed and Breakfast).


Recipe for: Western Omelette

From the Kitchen of: Margie Grieb Runels                     Servings:2

Need: Iron Skillet

Ingredients:

4 pieces of bacon
1 medium potato
Dash of salt and pepper
1 tsp dry minced onions
4 eggs
½ Cup grated Cheese
1 piece of bread

Instructions:

  • Fry bacon in frying pan(set aside)
  • Pour grease out of pan, but leave a tiny bit.
  • Put one medium size grated raw potato into pan on medium to low heat.
  • Season with salt & pepper and minced onion.
  • Cover potato and 4 beaten eggs.
  • Cover eggs with grated cheese.
  • Crumble two pieces of bacon on top.
  • Cover pan and cook on low for approx. 10 minutes until gelled and firm.
  • Cut in half and serve with remaining bacon and toast.

**For more people just increase ingredients, and cut like a pie.

Even better when served with salsa!